Showing posts with label Sweets. Show all posts

Monday, February 3, 2014

Family Favorite: Perfect sugar cookies


I'm not exaggerating, these are perfect. Growing up, I remember making sugar cookies with my grandma, which usually meant rolling the dough out pretty thin, cutting them into shapes, and when they'd emerge from the oven they looked poofy and nothing like the shapes we started with. It was always such a disappointment. I can't say I ever really enjoyed the taste of them either.

These sugar cookies are nothing like that. These sugar cookies are moist, crazy delicious, extra thick, they hold their shape and sharp edges, and in the seven years I've been making them, they turn out perfect every time—they're no-fail! You can even flavor them to match the mood of that season; maybe peppermint for Christmas, lemon for Easter, or pumpkin spice for the Fall. I've learned a few tips along the way that I think add up to the most delicious sugar cookie recipe you'll ever need. I hope you enjoy them as much as our family and friends do.


Perfect Sugar Cookies
Makes about 6 dozen 3" cookies, recipe can easily be halved

Ingredients:
6 cups all-purpose flour
1 tablespoon baking powder
1 teaspoon salt
2 cups butter, I almost always use Kerrygold Irish Butter
2 cups granulated sugar
2 large eggs
1 teaspoon vanilla extract
1 teaspoon pure almond extract* (the secret and important ingredient!), or another flavor extract like peppermint, lemon, orange, etc

*For a stronger, but not too strong, almond flavor omit the vanilla and use 2 teaspoons of almond extract. It's really good! Or, this is where you can experiment with seasonal flavors like peppermint extract or pumpkin spice.

Wednesday, July 13, 2011

Sweet and Simple Strawberry Rhubarb Sorbet


If you hail from the Pacific Northwest, you get the whole rhubarb thing. It's always the first to mature and a sure sign that summer is just around the corner. And the leaves! They're oh so magical and larger than life. Don't eat them though, they contain various poisonous toxins. Did you know that rhubarb is also a "strong laxative"? TMI? Maybe, but good to know! Anyways, this was the first year I harvested my own rhubarb. This giant mop of greens all started from a couple measly stalks I dug up from my grandma's yard last year. How wild is that?!


For the past two weeks we've been getting the most flavorful strawberries I have ever laid my tastebuds on in our CSA box. They are so naturally sweet and pure bliss to gobble up. It doesn't look like we'll be getting them in our box again anytime soon, but I'm sure thankful for the times we've shared. To commemorate, I crafted a sweet and simple strawberry sorbet. At only 60 calories per serving, this is a healthy way to take in the first fruits of summer harvest (by the way, rhubarb is considered a vegetable). If you don't have an ice cream maker, here are some alternative methods to freezing your ice creams and sorbets.


Sweet and Simple Strawberry Rhubarb Sorbet
3/4 pound rhubarb (5 or 6 thin stalks), trimmed
3/4 cup sugar
10 ounces fresh strawberries (about 1 1/2 cups), get the most flavorful ones you can find!
1/2 teaspoon freshly squeezed lemon juice

Cut the rhubarb into half-inch pieces. If your rhubarb stalks are more than an inch wide, slice them in half lengthwise. In a medium, nonreactive saucepan, bring the rhubarb, two-thirds cup water and the sugar to a boil. Reduce the heat, cover and simmer until the rhubarb is tender and cooked through, about 5 minutes. Cool to room temperature. This is also a perfect time to pull out a spoon and enjoy some rhubarb-y goodness!

Slice the strawberries and purée them in a blender or food processor with the cooked rhubarb mixture and lemon juice until smooth.

Note: It is important to make sure you are using the most flavorful strawberries you can find. This will affect the outcome of your sorbet. If your strawberries are not very sweet, try slicing and covering them in a tablespoon of sugar. Let them sit for 30 minutes and then puree.

Chill the mixture thoroughly, then freeze in an ice cream maker according to the manufacturer's instructions.

This is a fat free and low calorie dessert with only 60 calories per half-cup serving.

Recipe: latimes.com, Adapted from David Lebovitz's "The Perfect Scoop."
Nutrition facts: wikipedia.org

Monday, June 13, 2011

Reduced Guilt Frozen Banana Bites

I hope you all enjoyed our first post on Wisdom and Honey yesterday. It felt so good to get those precious memories written down before they began to fade. I have selectively terrible memory and often find myself forgetting the details of way too many important events. Writing is good for me.

I am a total sweets girl. I definitely have at least one dessert a day (more often than not I'll have two). However, it's also important to me that I'm eating a balanced diet and that my weekday desserts aren't overboard on fat or calories. I almost always have a bag of chocolate chips in the freezer to grab a palm full of, but it never really hits my sweet spot.

I've written more than once about one of my favorite semi-vegan/vegetarian/healthy lifestyle blogs, (never home)maker (now featuring (never home)maker woah baby!). Recently, Ashley posted about her Frozen Banana Bites. This was it! The solution to my weekday sweets craving.


I gave them a shot not knowing whether they would truly hit the spot, but oh baby did they! She wasn't kidding when she claimed that the bananas turn into a faux vanilla ice creamy center. My husband and I are totally hooked. And they're vegan if you use the right chocolate chips. Trader Joe's chocolate chips happen to be vegan.

I've noticed that they keep nicely for about a week without starting to taste a bit freezer burnt, which works great since a batch lasts a little over a week for us. Also, three medium-large bananas seem to work perfectly per one bag of chocolate chips. Let us know if you try them, we would love to hear what you think!

Reduced Guilt Frozen Banana Bites
3 medium-large ripe bananas
1 bag of chocolate chips 
2-3 Tbsp peanut butter (we use organic/natural creamy)

Dump the bag of chocolate chips in a microwave safe dish along with the peanut butter and melt in 30 second intervals, stirring in between, until the chips are melted and smooth.

Slice your banana into five equal pieces.

Using a spoon, cover the banana in the chocolate mixture. I like to do one at a time. Then using two toothpicks, lift the banana bite out of the dish and onto your Silpat or parchment lined baking sheet.

Pop in the freezer overnight, or until you can't wait any longer to try one.

Sunday, August 8, 2010

Trader Joe's Pain au Chocolat

Pain au Chocolat: the ultimate French pastry. Have you tried Trader Joe's magic overnight pain au chocolat? $3.50ish for 4, you have no excuse not to. 


Just set them out before bed, and voila!, in the morning your tiny frozen pain au chocolat have grown into a beautiful plump pain au chocolate. Crazy, huh!


And when you wake up, you bake them. Simple and effective. Out come flakey, golden, buttery, delectable "homemade" pain au chocolat. Your house smells like a french bakery and your day is off on the right foot. No need to tell anyone you didn't make these by hand. I mean you could make them by hand if you really wanted, so who's to say... right? You're secret's safe here.


N
Now I'm not going to lie, these aren't exactly the best pain au chocolat I've ever had. And the fact that I'm eating it at home kind of kills the French Cafe vibe. Nonetheless, these are are worth a try—I will probably buy them again—and if nothing else, you can bake them to make your house smell delicious next time you have people over.

Saturday, August 7, 2010

French Onion Soup, Grilled Veg Quinoa Salad + Dan and Carrie


D
Dan and Carrie are great, no they're wonderful friends. Carrie has great style and loves food—we're kindred soles. But most of all, she loves the Lord and is an amazing listener. Don't you admire people that can hold themselves back from bursting out every thought? I'm definitely not one of those types.


D
I made them French Onion Soup and a Grilled Vegetable and Quinoa Salad that bursted with flavor. My family has always had a tradition of eating french onion soup on or around Christmas...usually with king crab legs, mmm. I've never made it on my own, let alone during summer, so it was sensory overload to have my apartment smell of Christmas near August. A delight to say the least.


D
I haven't had a Le Creuset (or any French/Dutch oven for that matter) until very recently. I have never had such a wonderful onion cooking experience, no burning, no sticking, no nothing bad. Just moist, slow cooking, drool-inducing onions. Onions on the stove are one of the best things in the universe. I take that back—Onions cooking in a stick of butter on the stove are one of the best things in the universe. I'm pretty sure I could have left these onions for an hour without them burning. Get a dutch oven, it's so worth it!

Note: To give you a visual landmark, the onions cooked for about another 10 minutes after the second onion photo above. They should be near falling apart, goopy and stringy. 

D
An important part of french onion soup is the crusty bread. Shame on the person with no bread for their french onion soup. 

Crusty, Cheesy Crostini:
Slice a baguette (preferably a day old, but no biggie if not) in 1/4"–1/2" slices. Drizzle or baste with olive oil. Salt and pepper (pep is my secret trick to awesome toasts) the top of the toasts. Put under the broiler until golden and crispy. Turn the toasts over, salt and pep again and top with the cheese you are using for your soup (we usually use Gruyere and Swiss). Broil again until bubbly and crisp. Set aside until dinner is ready.  


D
Don't you love the way Carrie tied her belt? I do. 


D
Frankie also came for dinner. Mia wasn't excited about her arrival, but retreated to the bedroom for some solace. 

Dessert was Chocolate Pots de Creme. These are so easy to make and so perfect to make ahead for a dinner party, so long as you have space in your refrigerator (no baking required). They were somewhat of a cross between a chocolate mousse and a chocolate pudding—closer to the pudding side.  I topped them with a spoonful of fresh-made whipped cream. There are so many flavor possibilities with this dessert! A fantastic night it was!


Special Tools: Crockpot, French/Dutch oven, Small ramekins (Pots de Creme), Oven with broiler, Blender

Grilled Vegetable and Basil Quinoa Salad:
The Grilled Vegetable and Quinoa Salad was wonderful and will certainly be on my dinner rotation list for life. You could replace the quinoa with lettuce, cous cous or even pasta. I used red quinoa, which is available at Trader Joes, I just love the color.

Check out the inspiration recipe here. For my salad, I used cherry tomatoes, marinated artichoke hearts, thin asparagus, crimini mushrooms, jarred roasted red peppers, and bocconcini mozzarella (added at the very end when assembling the salad. Don't cook this!). The simple dressing and the addition of basil to the quinoa is phenomenal!

I presented the salad with all the grilled veg on top and we tossed it at the table.

Note: I used 2 cups dry quinoa to feed 4 people well.

French Onion Soup:
This happens to be the recipe my family has always used. I highly recommend using Vermouth instead of Cognac. Vermouth is really inexpensive—about $5 at a liquor store.

I used a 50/50 mixture of sweet onions and red onions. I only used the red onions because I have a bag of them on hand. I would recommend using all sweet onions, but it honestly doesn't make too much of a flavor difference. I've read in the past that red onions make your soup murky. I didn't notice it doing so, but maybe if that's all that I used. Who knows..

Note: I double this recipe to feed 4 people with enough left for dinner for two the next day. Because of this, I increase the cooking time to 4-5 hours in the crockpot.

Chocolate Pots de Creme:
Recipe from my Aug/Sep 09 issue of Food Network Magazine, found online here. It says it feeds 6–8, but I would say 4–6 is a better portion. The image above is a 4-serving portion size.

Sunday, July 25, 2010

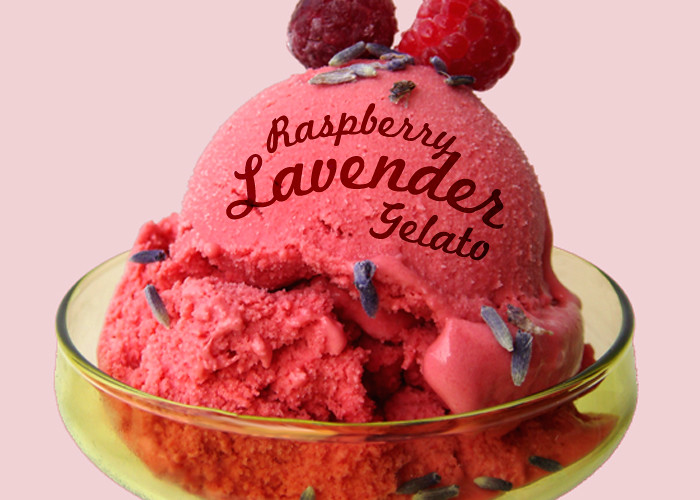
Raspberry Lavender Gelato


This gelato is perfect. No lie, I'm pretty sure it's the best thing I've ever made. Let's just see how many times I claim that...

A delicate marriage of comforting lavender and fresh raspberry. This gelato is perfect for a hot summer day. Don’t be afraid to use frozen raspberries (no one will ever know). Also, don’t forget to freeze your ice cream maker bowl 24 hours ahead (flashback to the great chocolate cherry froyo disaster of '08).

Tools: Food processor or blender, fine mesh sieve or chinois, spatula or wooden spoon, 2.5 qt heavy bottom saucepan, whisk, extra bowls, food thermometer, measuring cups & spoons, ice cream maker (I have a 2qt Cuisinart)


Raspberry Lavender Gelato
4 c. Red Raspberries (thawed if frozen)
1 c. granulated sugar
2 1/4 c. half-and-half, divided
6 large egg yolks
1/4 c. fat free powdered milk
1 c. heavy cream
2 tsp. pure vanilla extract
2 Tbsp. dried edible lavender flowers
a few drops of red food coloring (optional to enhance color)

Place raspberries in a food processor fitted with the metal “s” blade or in a blender (if using a blender, 2 cups at a time for best results). Process until completely pureed and smooth. Press raspberry puree through fine mesh sieve with a spatula. Toss out the seeds and you should be left with about 2 cups of puree. Set this aside.

Mix sugar and 1 1/4 cups of the half-and-half in a 2 1/2 qt heavy bottom saucepan, add lavender. Bring to a simmer over medium heat and stir to dissolve the sugar. Keep warm over low heat. Place the egg yolks in a medium bowl and whisk until thickened, about 2 minutes. While whisking, add 1/2 cup of the hot half-and-half/sugar mixture and whisk until blended. Stir the egg mixture back into the saucepan; increase heat to medium. Stir the mixture constantly until it is thick like a custard sauce and registers 180º with an instant read thermometer. 


Stir in remaining half-and-half, powdered milk and heavy cream. Strain the mixture through a fine mesh sieve. Stir in reserved raspberry puree, vanilla and optional food coloring. A natural substitute could be beet juice, if you would rather. This may slightly affect the taste, but I haven’t tried. Cover and refrigerate for at least 6 hours before continuing.


Make sure your ice cream maker’s bowl is completely frozen. If you hear any sloshing inside the container keep freezing. Mine usually takes about 24 hours to completely freeze. Turn the machine on and pour your chilled mixture into the frozen bowl. Mix until thickened, about 20-25 minutes. The gelato will have a soft, creamy texture. This is my favorite point to dig in! However, if you are looking for a more solid consistency, transfer the gelato to an airtight container and freeze for about 2 hours. Remove from the freezer about 15 minutes before serving for easy scooping. Happy churning!

Friday, July 16, 2010

Lemon Blueberry Vanilla Bean Cupcake


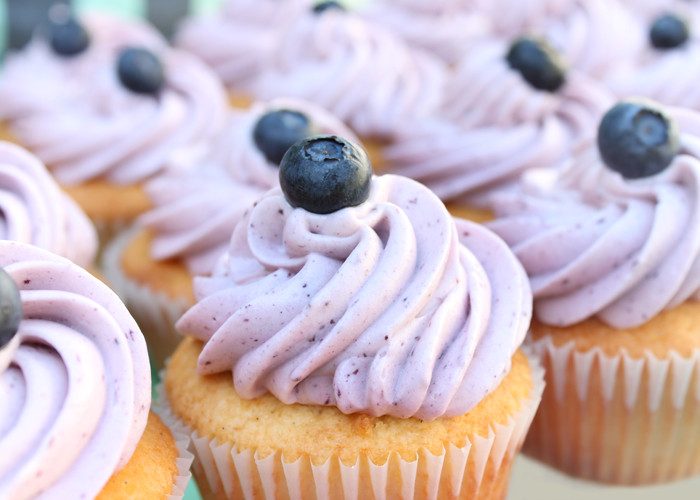
Lemon Curd filled vanilla bean cupcake, with blueberry swiss meringue frosting. A treat for Grandma P's 91st birthday, these cupcakes would be perfect for any summertime barbeque/pool/garden party. The Blueberry Swiss Meringue is pretty subtle in blueberry flavor. If you would like, add a few drops of blueberry oil to take your cupcake to blueberry heaven.

Lemon Curd
1/2 c. Freshly squeezed lemon juice (about 4 lemons)
3/4 c. White sugar
2 eggs
1 stick unsalted butter, softened and cut into pieces

With your microplane, grate enough lemon zest to measure 2 teaspoons. It is much easier to do this before you juice your lemons. Now, juice your lemons (I love this orange-size juicer). Whisk together zest, lemon juice, sugar and eggs in a metal bowl and add softened butter. Set bowl over a saucepan of simmering water and cook, whisking, until thickened and smooth and an instant-read thermometer registers 160ºF, about 5 minutes. Force curd through a fine sieve set into another bowl.

Serve warm, or let cool slightly and cover the surface of the curd with wax paper until cooled completely. The curd will keep covered and chilled for up to one week.

Please don't hesitate to eat the curd straight from the bowl :)

Blueberry Swiss Meringue Buttercream
5 Egg whites
1 1/4 c. White sugar
2 c. Room temperature unsalted butter (4 sticks or 1lb), cut into very small pieces
1/4 c. + 2 Tbsp Blueberry puree (Instructions to follow)
Pinch of salt

Place sugar and egg whites in the heat-proof bowl of an electric mixer. Set bowl over a pan of gently simmering water, and whisk until sugar has dissolved and egg whites are hot to the touch, about 3 minutes. Test by rubbing the mixture between your fingers; you shouldn't be able to feel any sugar granules. Transfer bowl to mixer stand. Using the whisk attachment, beat on high speed until mixture has almost completely cooled and formed still and glossy peaks, about 8-10 minutes. Stiff peaks should be able to stand without falling over when you lift the whisk straight out of the bowl and turn it upside down (frosting pointing toward the ceiling).

Now to add the butter. If it is truly room temperature, it will be too soft to cut. So using your spatula, scrape no more than 1 tablespoon of butter into the egg mixture at a time. Beat until incorporated after each addition. The buttercream may appear curdled after all the butter has been added; it will become smooth again with continued beating. Add blueberry puree and salt and beat until just combined.

Switch to the paddle attachment, and beat on the lowest speed to eliminate any air pockets, about 5 minutes. If using the buttercream within several hours, cover the bowl with plastic wrap and set aside at room temperature in a cool environment. Or transfer to an airtight container, and store in the refrigerator for up to 3 days. Before using, bring buttercream to room temperature, and beat on the lowest speed with the paddle attachment until smooth, about 5 minutes.

Blueberry Puree
1 lb Blueberries (fresh or frozen)

Bring blueberries to a boil in a sauce pan. Reduce heat to low and simmer until most of the liquid has evaporated—about 1/2 hour—and the mixture is thick, stirring occasionally.

Cool blueberries slightly and transfer to a blender. Mix until smooth. Once pureed, pass the mixture through a fine sieve set into another bowl.

This recipe makes more than you really need. Use the the rest on top of pancakes, waffles, ice cream, meat (or tofu!). Or simmer the leftover with a bit of honey to make a blueberry honey syrup.

To assemble cupcakes:
Make your favorite vanilla (or vanilla bean) cupcakes—I haven't found a favorite yet, any suggestions? I like a dense, but not too dense, super moist cake, with a pronounced vanilla flavor. No luck so far in life.  Anyways, once cooled, using an apple corer or melon baller, scoop about 2–3 tsp of cake out of the center. Don't throw away these insides, that's the best part of the cupcake! Eat them or package them up for a kiddo. Fill holes with the cooled lemon curd using a pastry bag, or by simply snipping the corner of a Ziploc bag filled with curd (I prefer this easy-to-clean-up method). You should have just enough curd to fill the entire batch of cupcakes—with a few extra spoonfuls (for your liking) built in.

Top with a swirl of the blueberry swiss meringue and a fresh blueberry for good measure. You should have enough frosting for one batch of cupcakes with about a cup left over, if frosted like I did in the image above.